sábado, 4 de octubre de 2014

Simple and Sweet Peanut Butter & Jelly Mini Cupcakes

 
Going back to school never tasted as sweet as these creamy PB&J-swirled cupcakes. We've combined two of our favorite nostalgic flavors into a cupcake, complete with a swirly top.


Mini PB&J Cupcakes

Mini PB&J Cupcakes

Ingredients

For the cupcakes:
1 box yellow cake mix, like Betty Crocker Super Moist
1 1/4 cups water
3/4 cup creamy peanut butter
1/4 cup vegetable oil
3 eggs
For the frosting:
1/2 cup heavy cream
6 ounces cream cheese
1/3 cup confectioners' sugar
1/2 teaspoon salt
1 cup creamy peanut butter
1/2 teaspoon vanilla extract
For the filling:
1 cup grape or strawberry jam

Directions

  1. To make cupcakes: Preheat the oven to 350ºF and place mini baking liners in mini muffin tins.
  2. In a large bowl, beat together cake mix, water, peanut butter, vegetable oil, and eggs until combined. Divide batter into mini cupcake wells, filling each well about 2/3 full. Bake for 12 to 15 minutes, or until a toothpick inserted comes out clean. Transfer cupcakes to a wire rack to cool.
  3. To make frosting: Meanwhile, in the bowl of a stand mixer fitted with the whisk attachment, or using a hand mixer, whisk heavy cream until soft peaks form.
  4. In another large bowl, beat together cream cheese, confectioners' sugar, salt, peanut butter, and vanilla on medium speed, until combined. Then carefully fold the whipped cream into the peanut butter icing until smooth and fluffy.
  5. To assemble cupcakes: Fit a piping bag with a star tip, then fill the bag with jam. Inject the tip into the center of each cupcake and squeeze to fill the center of the cupcake with jam, just until it swells but does not overflow.
  6. Into a second piping bag, fill grape jam on one side and peanut butter frosting on the other side. Pipe frosting into a swirl on each cupcake. Let cupcakes set in the fridge for about 15 minutes before serving.

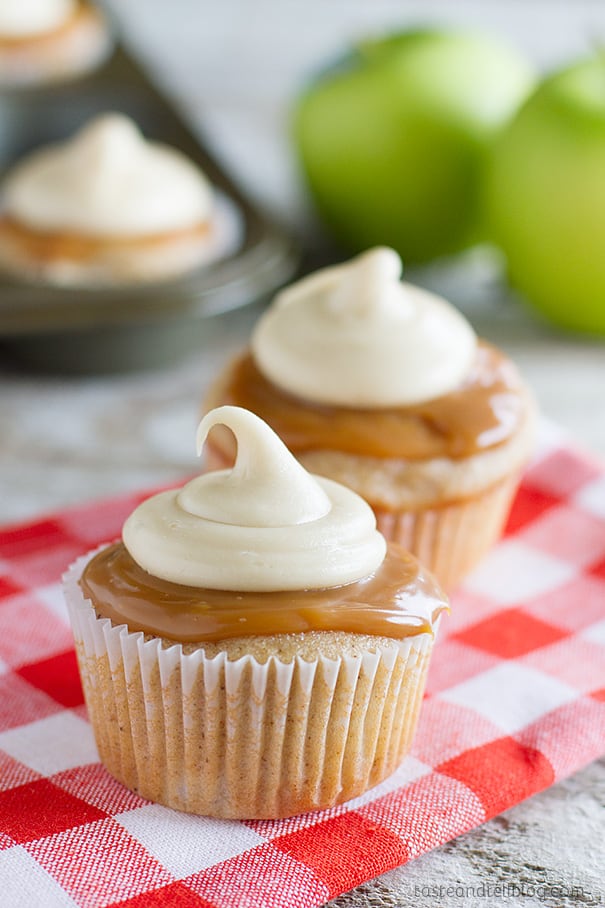
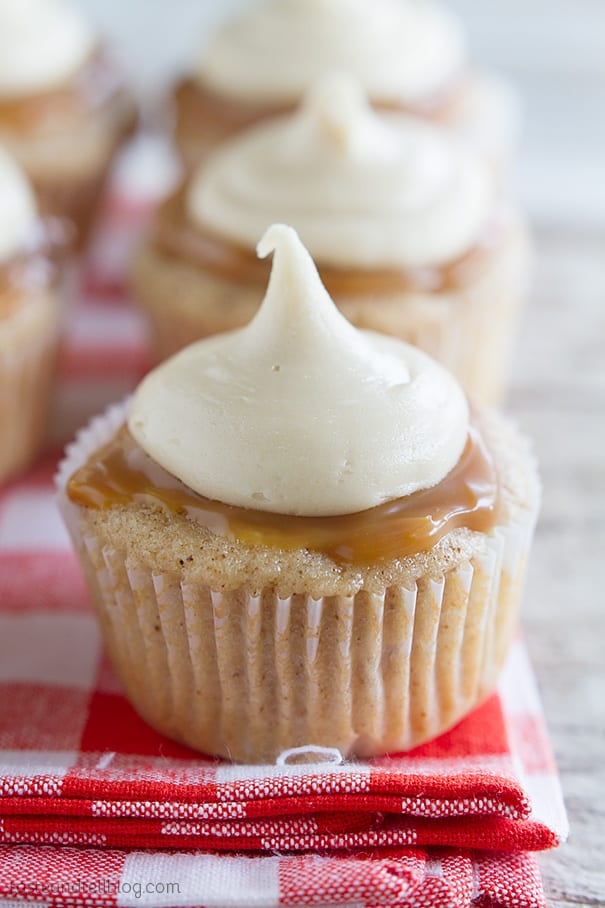
Caramel Apple Cupcakes

Spiced cupcakes are filled with fresh apples and then topped with caramel sauce and a thick caramel icing in these Caramel Apple Cupcakes that are perfect for fall.
Caramel Apple Cupcakes - it is fall in a cupcake!


Well, I caved. I know the official start of fall isn’t for a couple more weeks, but I couldn’t help myself. I’ve spent too much time on Facebook and Pinterest lately, and all everyone is talking about is apple and pumpkin. So even though the days may still be hot as can be, it looks like you all are ready to turn to fall.
(But don’t worry – I’m sure I’ll still have another summer recipe or two thrown in the mix before the summer is officially gone!)
I love making cupcakes. I would seriously make a new one every week if I could get away with it. And while I do enjoy eating them, I really have fun creating them. And these Caramel Apple Cupcakes were no exception. I actually ran across a caramel apple cupcake recipe in a cookbook, but the recipe started with a cake mix and the topping was simply caramel sauce drizzled on the top. And while I’m sure those cupcakes were just fine, and maybe even delicious, I knew I wanted something more.

So I went to town. I had my family to test these on, and from what I could tell, everyone loved them. I know I did. I sampled way too many of them, so I had to leave them all behind at my sister’s house so that I would stay away from them.
For the Caramel Apple Cupcakes, you start with a simple spiced cupcake, and then load in the fresh apples. I used granny smith apples so that the tart apple flavor would shine through. The cupcakes are baked and then cooled. I knew I wanted to add the caramel icing, but I wanted to add another layer of caramel as well. I had seen people do caramel candy melted with cream or evaporated milk, but I know that you have to get the temperature just right, otherwise it will totally harden so that you can’t even bite into it. My solution? The caramel dip that you can find in the produce section of the grocery store. It’s thick enough to stay in place on top of the cupcake, but stays soft and delicious.
The caramel icing isn’t your typical cupcake icing. It’s much thicker, not like most light and fluffy frostings. But I love this stuff. It does harden if you don’t work fast enough, so be prepared to make the icing and pipe it on right away.
These caramel apple cupcakes scream fall, and I’m excited to be welcoming in fall baking. There’s nothing better than a house that smells like sweet spices while you are baking!
Caramel Apple Cupcakes on Taste and Tell


Caramel Apple Cupcakes
Prep Time: 30 minutes
Cook Time: 25 minutes
Total Time: 1 hour, 30 minutes
Yield: 24 cupcakes
Spiced cupcakes are filled with fresh apples and then topped with caramel sauce and a thick caramel icing in these Caramel Apple Cupcakes that are perfect for fall.
Ingredients
    Cupcakes:
  • 1/2 cup butter, at room temperature
  • 1 cup sugar
  • 1 egg
  • 1 3/4 cups all-purpose flour
  • 3/4 teaspoon baking powder
  • 1/2 teaspoon salt
  • 1/2 teaspoon allspice
  • 1/2 teaspoon cinnamon
  • 1/2 teaspoon nutmeg
  • 1/4 teaspoon baking soda
  • 1/4 teaspoon cloves
  • 3/4 cup milk
  • 2 cups chopped tart apples
  • Topping
  • 1/2 cup caramel apple dip (found in the produce section)
  • 1/2 cup butter
  • 1/2 cup brown sugar
  • 3 tablespoons heavy cream
  • 3 cups powdered sugar
  • 1/2 teaspoon vanilla extract

Instructions

  1. Preheat the oven to 350. Line 24 muffin tins with paper liners.
  2. In a large bowl or stand mixer, beat the butter until smooth. Add in the sugar and beat until light and fluffy. Add the egg and mix. Scrape down the sides of the bowl as needed.
  3. In a bowl, combine the flour, baking powder, salt, allspice, cinnamon, nutmeg, baking soda and cloves.
  4. Add 1/3 of the flour mixture to the butter and sugar mixture. Mix until combined. Add half of the milk, mix, then 1/2 of the remaining flour, the remaining milk and then the remaining flour, beating in-between additions. Stir in the chopped apples.
  5. Divide the mixture between the prepared cups, filling each about 2/3 full. Bake until the center springs back when touched, about 20-25 minutes. Allow to cool completely.
  6. Spread about 1 teaspoon of the caramel topping on top of each cupcake.
  7. Melt the butter in a saucepan over medium heat. Add the brown sugar and cook until dissolved, a few minutes. Stir in the cream. Remove from the heat and add in half of the powdered sugar. Beat until combined, then add the remaining powdered sugar. Add the vanilla then beat until smooth and shiny. Transfer to a piping bag and pipe the frosting on top of the caramel sauce.                                                                                                                                                               Like what you see here? Make sure you are following Taste and Tell for more great recipes and ideas!!
                                                                                                                                                             

Caramel Apple Cupcakes Recipe


It’s officially fall and this Caramel Apple Cupcakes Recipe will be a great dessert idea. We love caramel and apples together. We are always whipping up fun apple and caramel desserts. I have shared quite a few with you like Our CopyCat Starbucks Caramel Apple Spice, Traditional Caramel Apples, Caramel Apple Dip and also a Snickers Caramel Apple Salad. I decided I needed a yummy cupcake to enjoy this weekend for dessert. Cake mixed with caramel, apples and oh goodness the nuts! YUM!
Caramel Apple Cupcakes Recipe

Caramel Apple Cupcakes Recipe

After making our caramel apples i popped a stick in them to replicate a real caramel apple. Too cute I must say!
Caramel Apple Cupcakes
This Caramel Apple Cupcakes Recipe uses a Spiced Cake Box Mix. You could always use a spice cake mix from scratch too! I also did the caramel the easy way and used some Kraft Caramels I had purchased on sale. Simple but so tasty.
Caramel Apple Cupcakes Recipe 1
INGREDIENTS
1 box Spice Cake Mix
1 cup Apple Juice
1/3 cup Vegetable Oil
3 Eggs
1 Granny Smith Apple, peeled cored and shredded
10 oz Caramels (about 36)
1/4 cup Milk
1/2 cup chopped peanuts
24 wooden sticks
Caramel Apple Cupcakes Recipe 2
DIRECTIONS
Preheat oven to 350.
Line muffin pan with paper liners.
Combine cake mix, apple juice, vegetable oil, and eggs in a large bowl.
Mix until well blended.
Mix in shredded apple, and fill the prepared liners about 2/3 full.
Bake about 20 minutes or until lightly browned and a toothpick inserted into the center of a cupcake comes out clean.
Allow to cool.
Melt the caramels with milk over low heat until smooth, stirring constantly.
Spread melted caramel over the cupcakes.
Sprinkle with chopped peanuts and insert a wooden stick into the center of each.
Caramel Apple Cupcakes Recipe 3
Caramel Apple Cupcakes Recipe 4
Caramel Apple Cupcakes Recipe 5
Caramel Apple Cupcakes Recipe 6
These Caramel Apple Cupcakes would make a great addition to your fall party dessert tables too. You could leave the nuts off of a few for those “non-nut eaters”. I personally love to load mine up with extra peanuts. yum!


Caramel Apple Cupcakes Recipe
Ingredients
  • 1 box Spice Cake Mix
  • 1 cup Apple Juice
  • 1/3 cup Vegetable Oil
  • 3 Eggs
  • 1 Granny Smith Apple, peeled cored and shredded
  • 10 oz Caramels (about 36)
  • 1/4 cup Milk
  • 1/2 cup chopped peanuts
  • 24 wooden sticks
Instructions
  • Preheat oven to 350.
  • Line muffin pan with paper liners.
  • Combine cake mix, apple juice, vegetable oil, and eggs in a large bowl.
  • Mix until well blended.
  • Mix in shredded apple, and fill the prepared liners about 2/3 full.
  • Bake about 20 minutes or until lightly browned and a toothpick inserted into the center of a cupcake comes out clean.
  • Allow to cool.
  • Melt the caramels with milk over low heat until smooth, stirring constantly.
  • Spread melted caramel over the cupcakes.
  • Sprinkle with chopped peanuts and insert a wooden stick into the center of each.


Coments?

.
.

Frozen blue velvet Cupcakes

Frozen Blue Velvet Cupcakes
I’ve never been one to choose a red velvet cupcake, I am a chocolate girl all of the way, but I have to tell you these cupcakes are ah-mazing! Not just a pretty face, they are impressively good (even with my average baking skills). And paired with the buttercream frosting, oh my! 
Blue Velvet Cupcake
Cupcake Ingredients 
  • 2 ½ cups cake flour
  • 1 ½ cups sugar
  • 1tbsp. unsweetened cocoa powder
  • 1 tbsp. baking soda
  • 1 tsp. salt
  • 2 eggs, at room temperature
  • 1 ¼ cups vegetable oil
  • 1 cup buttermilk, at room temperature
  • 1 tbsp. dark blue food coloring
  • 1 tiny dab violet gel food coloring
  • 1 tsp. vanilla extract
  • 1 tsp. white vinegar
Buttercream Frosting Ingredients
  • 2 ½ sticks unsalted butter, at room temperature
  • 2 ½ cups confectioners sugar (10 oz)
  • ¼ tsp. salt
  • 1 tbsp. vanilla extract
  • 2 tbsp. heavy cream 
To give them just the right Frozen look I decorated my cupcakes with Wilton baking cups and  Wilton Sugar Pearl Sprinkles.
Tip – The recipe calls for a dab of violet gel food coloring, which I used. It looks pretty, but it is darker than I anticipated. Next time I make Frozen cupcakes, I will forgo the violet.
Inside Blue Velvet Cupcake

Blue Velvet Cupcakes

Preheat the oven to 350 degrees. Insert cupcake liners or spray cupcake pan with non-stick spray.
In a medium bowl, sift together the flour, sugar, cocoa powder, baking soda and salt. In a large bowl, combine the eggs, oil, buttermilk, food coloring, vanilla, and vinegar. Whisk vigorously until well combined and smooth. Add the dry ingredients to the wet and whisk until smooth, about 1-2 minutes.
Divide the batter evenly in the cupcake tray, filling each hole about ¾ fill. Bake for 17-19 minutes, or until the tops spring back when lightly pressed with your fingertip and a toothpick inserted in the center comes out clean. Transfer the pan to a wire rack and let the cupcakes cool for a few minutes. Remove them from the pans to cool completely.

Buttercream Frosting

In a large bowl, beat the butter with an electric mixer for about 20 seconds. Add the confectioners sugar and salt and beat at medium-low to incorporate the sugar. Increase the speed the medium and beat until filly combined, about 30 seconds, scrapping down the sides of the bowl as necessary.
Add the vanilla and heavy cream and beat on medium speed until combined. Increase the speed to medium-height and beat for about 4 minutes, or until the mixture is very light and fluffy. You may need to scrape the sides of the bowl as necessary.
Frost the cupcakes once they are completely cool.
Cupcakes Blue Velvet


Coments?

.
.

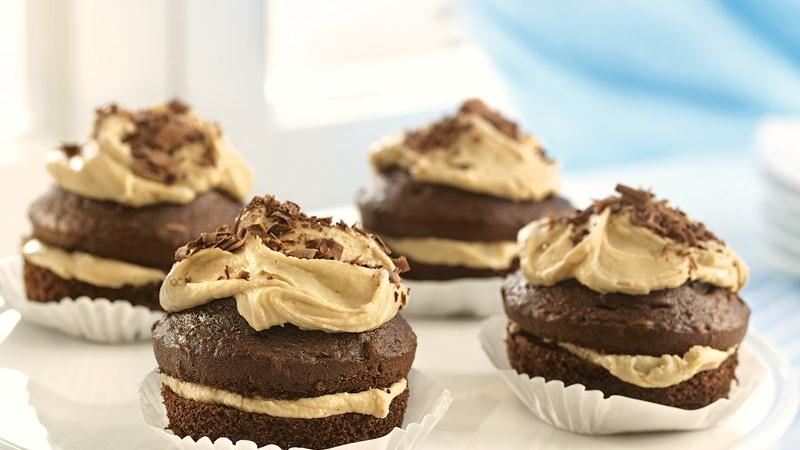
Chocolate Cupcakes with Penuche Filling


 Chocolate Cupcakes with Penuche Filling


Cupcakes

1
box Betty Crocker™ SuperMoist™ chocolate fudge cake mix
Water, vegetable oil and eggs called for on cake mix box
1
teaspoon vanilla

Filling and Garnish

1
cup butter or margarine
2
cups packed brown sugar
1/2
cup milk
4
cups powdered sugar
1
oz grated semisweet baking chocolate, if desired

Directions

  • 1 Heat oven to 350°F (325°F for dark or nonstick pans). Place Reynolds Baking Cups in each of 24 regular-size muffin cups. Make and cool cupcakes as directed on box for 24 cupcakes--except add vanilla to batter.
  • 2 Meanwhile, in 2-quart saucepan, melt butter over medium heat. Stir in brown sugar. Heat to boiling, stirring constantly; reduce heat to low. Boil and stir 2 minutes. Stir in milk. Heat to boiling; remove from heat. Pour mixture into medium bowl; refrigerate 1 hour or until lukewarm, about 90°F.
  • 3 Beat powdered sugar into cooled brown sugar mixture with electric mixer on low speed until smooth. If filling becomes too stiff, stir in additional milk, 1 teaspoon at a time. If filling is too soft, cover; return to refrigerator 15 minutes to firm up.
  • 4 Remove Reynolds Baking Cups from cupcakes. Using serrated knife, cut each cupcake in half horizontally, being careful not to break either half. Place heaping 1 tablespoon filling on each cupcake base. Replace rounded cupcake tops. Pipe or spoon rounded 1 tablespoon frosting onto cupcake tops. Garnish with grated chocolate. Store in airtight container at room temperature.                            


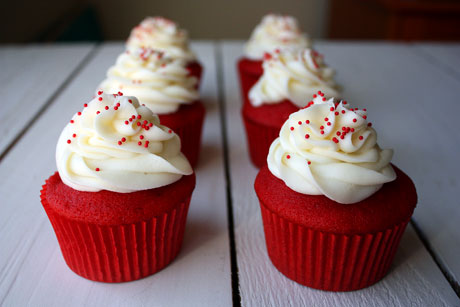
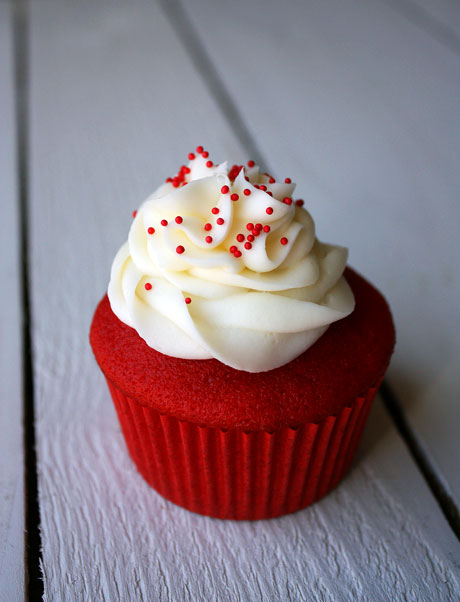
It's the time of year for every food blogger to post something red velvet, so I figured I had better jump on the wagon. The L-O-V-E holiday is coming up in less than a week, and if you haven't made one of these, it's about time! What's the deal with red velvet you ask? Well, it's a buttermilk cake with a hint of cocoa in it. It definitely doesn't taste like chocolate. It's a bit tangy, and when paired with cream cheese frosting, it's pretty incredible. Plus, it's pretty. And we all love that, right?

I have tried several red velvet cake recipes, and this is my favorite by far. They have great flavor, they're not dry, and they are bright red. Last year I made mini green velvet cupcakes for St. Patrick's Day, so know that you can substitute out the food coloring if you want to go with something different. It was a fun change! I almost always use gel food color, but with these you'll need the liquid. Do yourself a favor and buy the separate bottle of red food color that is one ounce. Perhaps if you don't have to measure anything, maybe you can do a better job of avoiding getting red dye everywhere. Including on your hands and under your nails. Or maybe that's just me who does that every.single.time!

Red Velvet Cupcakes Recipe
Makes about 20
Print this recipe

*If you're baking at high altitude, please follow the * adjustments!

For the cupcakes:
1 cup shortening
1 3/4 cup sugar
2 1/4 cup cake flour
1 1/4 teaspoon salt
2 eggs (*3 eggs*)
1 cup (*plus 2 tablespoons*) buttermilk
1 teaspoon vanilla
1 teaspoon (*3/4 teaspoon*) baking soda
1 1/2 teaspoon white vinegar
1 ounce red food color
1 1/2 teaspoons cocoa powder 

For the cream cheese frosting:
1 1/2 packages cream cheese (12 ounces)
3/4 cup butter
1 1/2 pounds powdered sugar
1/4 teaspoon salt
2 teaspoons vanilla

Preheat your oven to 350 degrees (*375 degrees for high altitude*).

In your mixing bowl fitted with the paddle attachment, cream together the shortening and sugar. In a large liquid measuring cup, combine the eggs, buttermilk, vanilla, baking soda, vinegar, and salt. Add the flour into the mixing bowl in three additions, alternating with the wet ingredients. Start and end with the flour. Once combined, stir together the red food color and cocoa powder in a small bowl. Add into the batter and mix just until incorporated.

Divide the batter into muffin tins with liners, filling each with about 1/4 cup of batter. Bake for 15-17 minutes (*12-15 minutes*) or until a toothpick comes out clean. Cool in the pan for a few minutes and then remove from the pan to cool completely.

While the cupcakes are cooling, make the cream cheese frosting. In your mixing bowl fitted with the paddle, cream together the butter and cream cheese until smooth. Add the vanilla and salt and mix until incorporated. Add the powdered sugar in three additions and mix until smooth. Pipe onto cooled cupcakes.

Source: The Pioneer Woman Cooks cookbook

 Comets?

.

.


Cotton Candy Cupcakes


for:
Elizabeth LaBau 


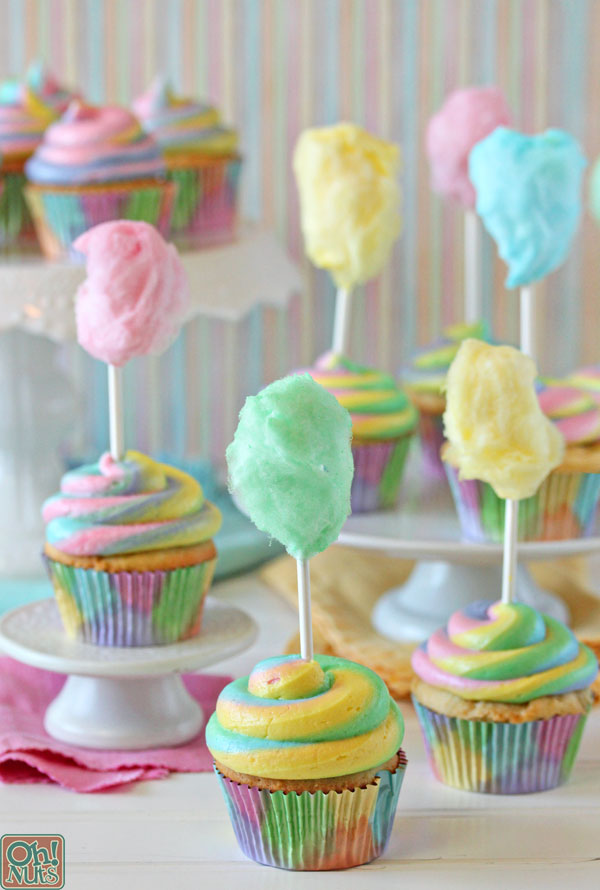
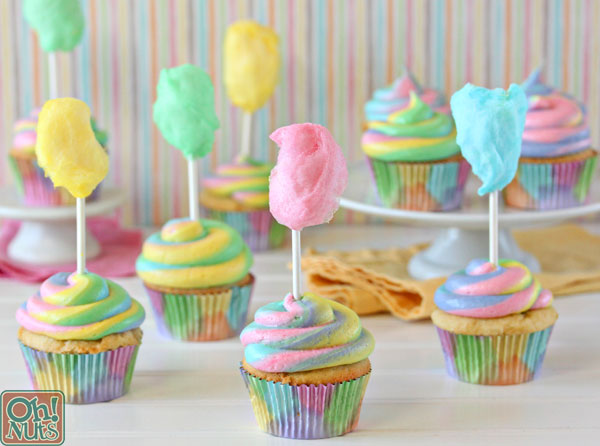
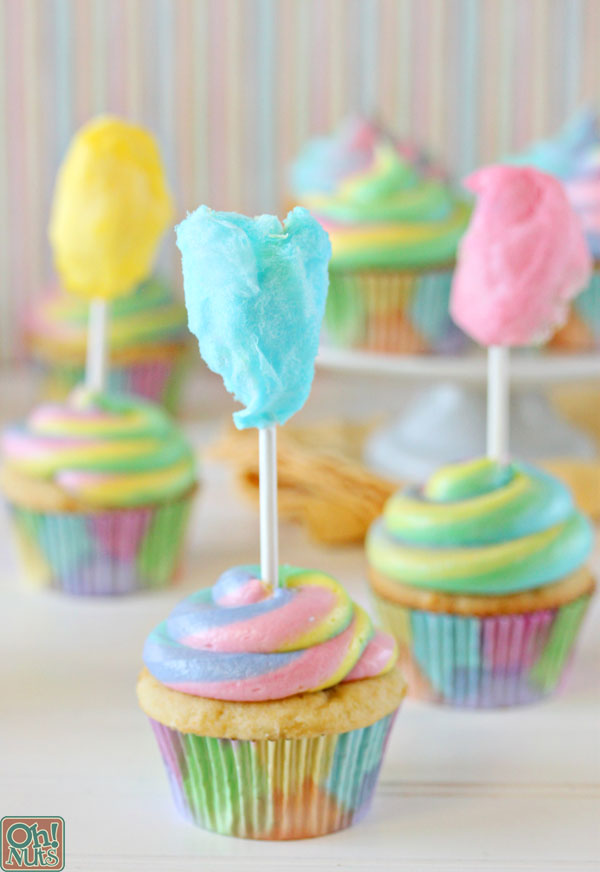
Okay, party people, hold on to your pointy hats, because I’m about to share the cutest party idea ever! These Cotton Candy Cupcakes are super fun, super easy, and super adorable!
Cotton Candy Cupcakes | From OhNuts.com
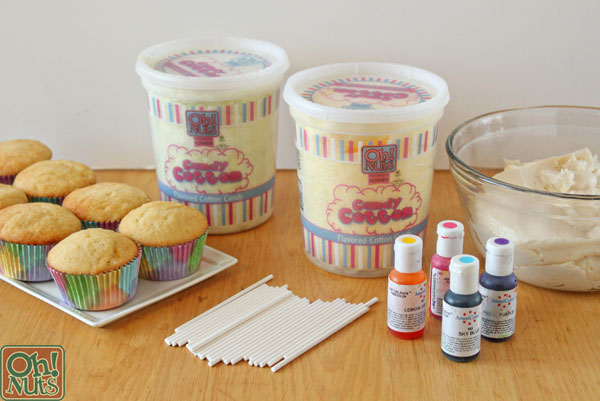
It’s simple to turn regular cupcakes and boring white frosting into these beautiful multicolored desserts! A few drops of food coloring are all you need to make these gorgeous frosting swirls, and they’re the perfect base for the mini cotton candy toppers. Oh Nuts  sells a wide variety of delicious flavored cotton candy in bright colors, like Pink Cotton Candy (cherry), Blue Cotton Candy (raspberry), Yellow Cotton Candy (lemon), and Green Cotton Candy(lime). If you carefully wrap a little cotton candy around a lollipop stick, it looks just like a miniature version of the real thing!
Cotton Candy Cupcakes | From OhNuts.com
Can you imagine a whole tray of cotton candy cupcakes lined up at a kid’s birthday party, a baby shower, or a carnival-themed event? They’re so eye-catching and fun! You can also use this same idea and top a birthday cake with a border of cotton candy sticks. It’s an easy idea, but there are a few tips and tricks to make it go smoothly, so check out the step-by-step pictures and recipe down below. Let’s get our cotton candy on!
Cotton Candy Cupcakes | From OhNuts.com
Cotton Candy Cupcakes
yield: 24 cupcakes

Ingredients

  • 24 cupcakes, baked and cooled
  • 8 cups white buttercream frosting
  • Assorted food coloring
  • Two disposable piping bags
  • 24 lollipop sticks
  • Cotton candy (I used yellow, green, pink, and blue)
Cotton Candy Cupcakes | From OhNuts.com
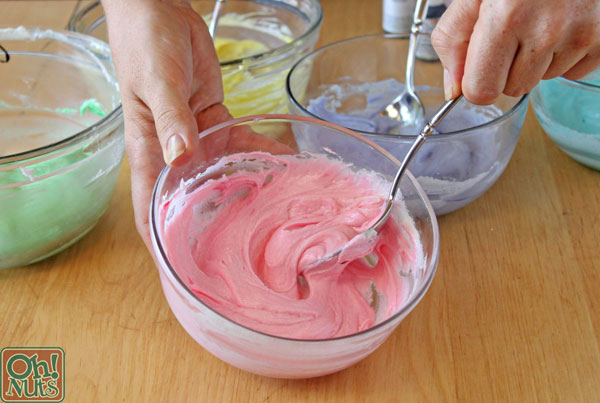
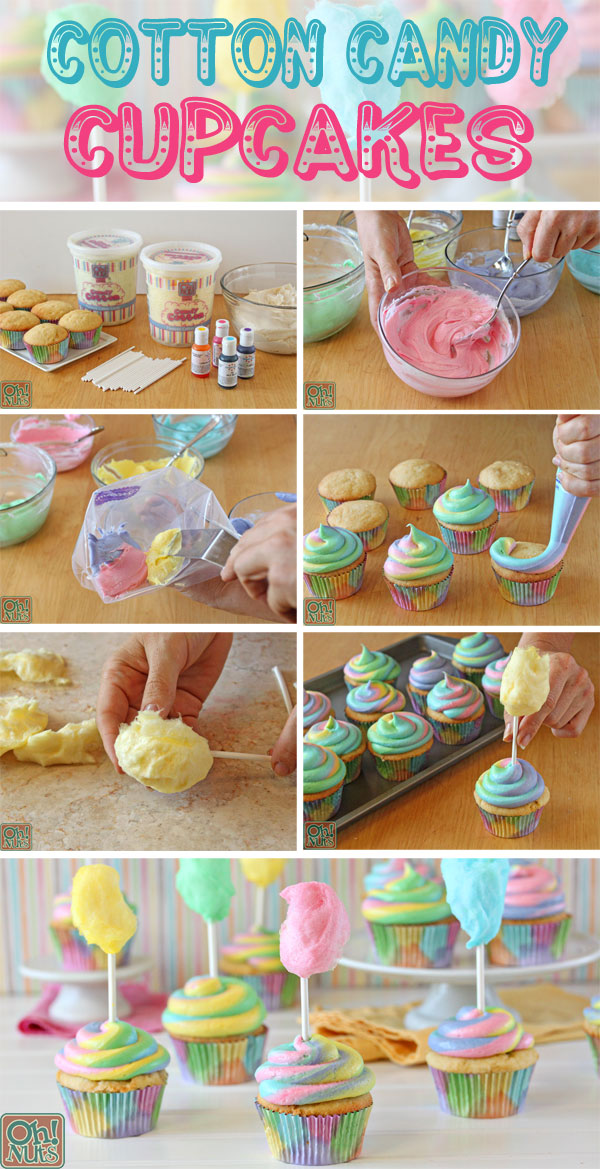
Start by making that boring white frosting a bit more interesting! First off, you can add any flavoring extract you’d like–vanilla, coconut, almond, lemon, or orange are all great choices. Once the frosting is the flavor of your choice, decide how many different colors you want. I recommend using 3-5–any fewer than that, and you might not get the rainbow effect, and any more than that and the frosting can start to look too muddy or busy.
Divide the frosting into the number of bowls that you need, and add a few drops of coloring to each bowl. Stir until each color is bright and vivid, with no white streaks remaining.
Cotton Candy Cupcakes | From OhNuts.com
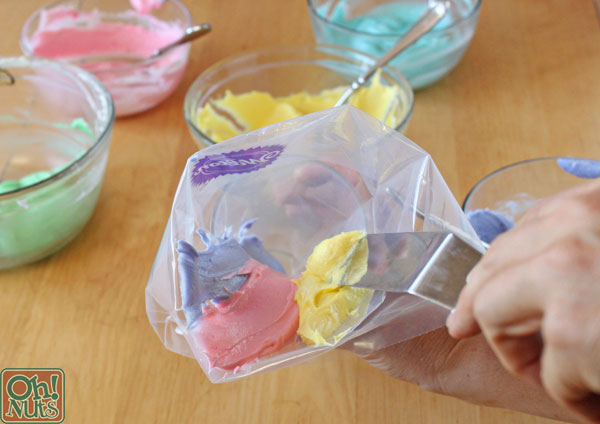
Use a spatula to spread a thick stripe of each color up the inside of a disposable piping bag. If it helps, you can stick the bag inside a tall glass before filling it, to give it more strength and structure. You will have too much frosting for one piping bag, so use about half of each color to fill this one bag, and then fill a second bag the same way.
Cotton Candy Cupcakes | From OhNuts.com
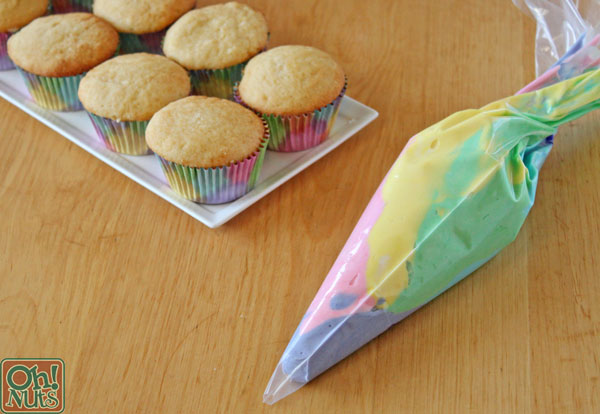
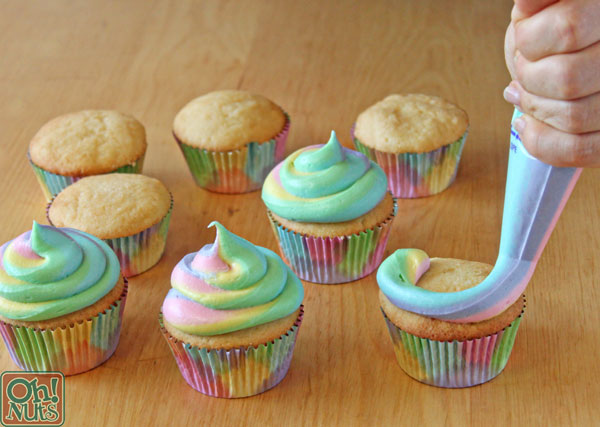
When you finish, you should have two piping bags full of stripes of different colors of frosting. Don’t worry if they’re not perfectly even–the swirls will still turn out beautifully. Twist the bag closed at the top, and snip off the tip so that there is a 1/2-inch opening at the bottom.
Cotton Candy Cupcakes | From OhNuts.com
Squeeze the bag for a minute, until the frosting starts to come out multi-colored. Pipe generous swirls on top of the cupcakes. When the first bag runs out, snip the tip off the second bag and continue piping until all of the cupcakes are frosted. Set the cupcakes aside for a moment.
Cotton Candy Cupcakes | From OhNuts.com
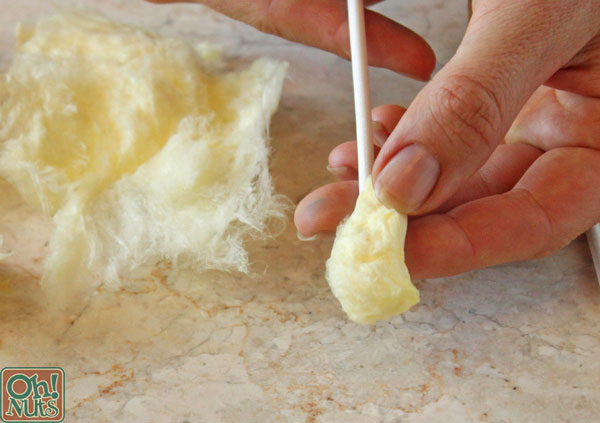
To make the miniature cotton candy sticks, take a generous pinch of cotton candy and press it around the top of a lollipop stick. Don’t be afraid to really squish it together, so that it adheres to the stick. It won’t look pretty, but it’s necessary to make a secure, sturdy cotton candy stick. Besides, it will be covered up in the end!
Cotton Candy Cupcakes | From OhNuts.com
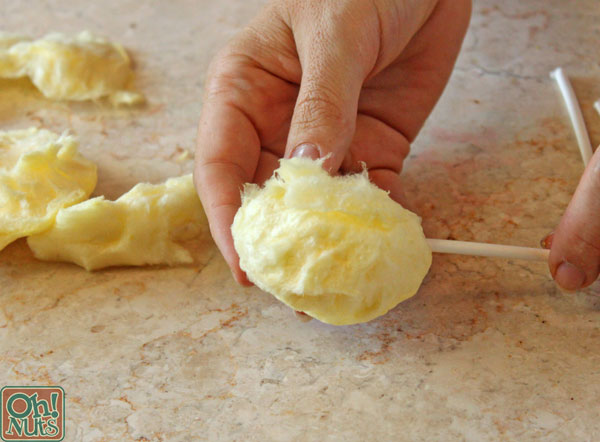
Now, take more cotton candy and gently press it around the top, being carefully not to compact it so that it remains light and fluffy. Try to gently tear the cotton candy apart so that it retains its airy, cottony texture. Continue building layers of cotton candy until it is the size you want. Repeat with more sticks and candy until you have as many as you need. Note that the cotton candy will start to absorb moisture from the air almost as soon as they’re assembled, so this is not a good make-ahead activity. Make these toppers right before you’re ready to serve the cupcakes! You probably have 20-30 minutes between assembly and when they start to look bedraggled–less in very stormy weather, and more in a dry climate.
Cotton Candy Cupcakes | From OhNuts.com
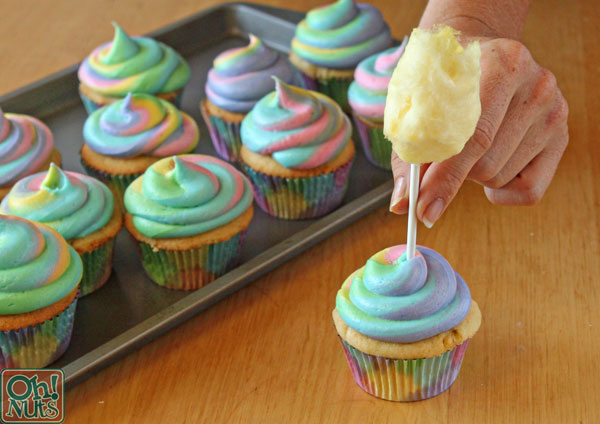
To finish, stick the cotton candy sticks down through the frosting and into the cupcakes. Serve and enjoy them immediately!
Cotton Candy Cupcakes | From OhNuts.com
As always, there’s an easily printable recipe and pin-able image below. I hope you enjoy, and I can’t wait to see how you use this idea for your own parties!

Cotton Candy Cupcakes
 
Prep time
Total time
 
These cotton candy cupcakes are so cheerful and fun, and they're perfect for birthdays and showers! The mini cotton candy sticks start to get sticky soon after they're exposed to air, and they probably last a total of 20-30 minutes before they're a sticky mess—so serve them immediately after assembly!
Author:
Serves: 24
Ingredients
  • 24 cupcakes, baked and cooled
  • 8 cups white buttercream frosting
  • Assorted food coloring
  • Two disposable piping bags
  • 24 lollipop sticks
  • Cotton candy (I used yellow, green, pink, and blue—see Note below)
Instructions
  1. Decide how many different colors of frosting you want, and divide the buttercream into that many bowls. Add a few drops of food coloring to each bowl and mix until you have vibrant pastel colors.
  2. Use a spatula to spread a thick stripe of each color up the inside of a disposable piping bag. If it helps, you can stick the bag inside a tall glass before filling it, to give it more strength and structure. Repeat with the remaining colors until your bag is full of vertical stripes of frosting.You will have too much frosting for one piping bag, so use about half of each color to fill this one bag, and then fill a second bag the same way. Twist the bag closed at the top, and snip off the tip so that there is a ½-inch opening at the bottom.
  3. Pipe generous swirls of multi-colored frosting on top of each cupcake. When your first frosting bag runs out, snip the tip off the second bag and continue until all of the cupcakes are frosted. Once they're frosted, set aside for a moment.
  4. To make the miniature cotton candy sticks, take a generous pinch of cotton candy and press it around the top of a lollipop stick. Don't be afraid to really squish it together, so that it adheres to the stick. Now, take more cotton candy and gently press it around the top, being carefully not to compact it so that it remains light and fluffy. Continue building layers of cotton candy until it is the size you want. Repeat with more sticks and candy until you have as many as you need.
  5. Stick the cotton candy sticks down through the frosting and into the cupcakes. Serve and enjoy immediately!
Notes
You will need 6-8 cups of cotton candy, total, for this project. This will be enough to make 24 mini cotton candy sticks, plus provide extra in case of mistakes. If you use four colors like I did, you will have plenty of candy left over for snacking or for other projects!
How to Make Cotton Candy Cupcakes
All text and images (c) Elizabeth LaBau 


Comets ?


.
.